2013년 2월 14일 목요일

DIY - Flower balls (Carnation)

CARNATION CENTERPIECE


diy_wedding


chandelier centerpiece


1. Carnation - $0.79 / stem 

http://www.flowerexplosion.com/by-flower/carnations/standard-carnations.html


http://www.samsclub.com/sams/carnations/1247.cp?searchTerm=null&altQuery=null&noOfRecordsPerPage=20&sortKey=p_sales_rank&sortOrder=0&brand=null&viewStyle=null&offset=21&totalRecords=44&compareProducts=true&previousPreferredFilter=all&searchCategoryId=1247

Carnation - $0.40 / stem 

Carnations - Orange - 150 Stems


Carnation - $0.43 / stem 
Carnations - Hot Pink - 150 Stems


Carnation - $0.61 / stem 
"Florigene" Moonaqua Carnations - 140 Stems


2. Floral Foam

OASIS Floral Sphere (4.5")   $2.25
OASIS Floral Sphere (6")      $4.99
OASIS Floral Sphere (8")      $13.19


3. Ribons

Carson And Gebel Apple Satin Ribbon (100 yards x 5/8" w)  $7.62 


4. Cylinder Glass Vase 4x12    $6.50


http://www.wholesaleflowersandsupplies.com/flared-23.5-inches-glass-vase.html
$18.50
23.5" Flared Glass Vase

Glass Cylinder Vases 7 1/4"
$1.00


Long-Stem Glass Tealight candleholders
$1 (min 48 order)


Etched Tapered Glass Stem vases 9 1/2"
$1 (min 24 orders)


Trumpet vase
$7.30 each (12pcs = $87.60)


Trumpet vase - 16" tall x 5"
$7.75
Trumpet Vase - 16" Tall x 5" Opening [32702] - Click Image to Close

5. Clear 2.5 cm vase fillers (1lb bag)    $5.50


6. Crystal Drop Garland (6.5 ft)       $9.99


7. Candlestick 4"    $2.59


HYDROGEA CENTERPIECE


1. Hydrogea Flower


2. Cylinder Glass Vase 4x12    $6.50


3. Apples


4. Fake Branches


5. Lots of candles

Flower types

1. http://michaelsfloralsupply.com/freshflowers.html

Fresh Cut Flowers
Premium Fresh Cut Flowers

Your access to the largest inventory of
Premium Farm Fresh Flowers in the Midwest.

We currently only provide shipping of our fresh cut flowers to customers in
Minnesota, Iowa, Wisconsin, and Western South and Western North Dakota.

For more information please contact us at:

sales@michaelsfloralsupply.com

612-251-1814


2013년 2월 13일 수요일

Wedding flowers DIY 2

Wedding flowers - 1
Underwater centerpieces & Floating candles

Option 1. Calla Lilly


Option 2. Orchid


** 접착제를 이용해서 줄기에 돌을 붙인다. 그러면 줄기를 막지 않을수 있다. 

준비물: 꽃 (튤립, 장미, 칼라), vase, 접착제, 크리스탈 혹은 돌, LED light (밤일때), Mirror (빌리면됨), Floating candles, mini candles, Rose Petal (optional)


How to Make Underwater Flower Centerpieces


How to Make Underwater Flower Centerpieces thumbnail
Make Underwater Flower Centerpieces
Underwater flower arrangements are a current trend in centerpieces. They are easy to make and inexpensive, and look very elegant. Many wedding banquet tables will be adorned with underwater flower centerpieces. Use the same flowers and colors as the wedding party to pull everything together. Make these up the day of the wedding so they will last longer. Almost any flower will work except for ones with a lot of pollen, which can cause the water to look cloudy. Does this Spark an idea?


Instructions


    • 1
      Place the clear stones in the bottom of each vase. Create a double layer of stones. Colored stones coordinating with the wedding party colors can be used instead, if preferred.
    • 2
      Choose two to three flowers for each vase. Make three groups of flowers. Cut each of the two to three flowers in each group to varying heights. Hold each group of flowers together by placing a rubber band around the stems about 1/2 inch from the ends. Slip a fishing weight inside the rubberbands on each group of flowers. This is used to weigh down the flowers so they won't float up in the water-filled vase. Push the stems of a group of flowers down into the stones on the bottom of each vase. Be sure the rubber band and weight cannot be seen.
    • 3
      Fill the vases with distilled water. Fill the water to within 1 inch from the top of each vase. Float a candle on top of the water in each vase. Note: Plain tap water can be used if desired, although sometimes it can be cloudy or create bubbles in the vase.
    • 4
      Set a round mirror in the center of the table. Place the three vases in the center of the mirror. Place small tea candles around the edges of the mirror encircling the vases. Light the candles.


Read more: How to Make Underwater Flower Centerpieces | eHow.com http://www.ehow.com/how_4614239_underwater-flower-centerpieces.html#ixzz2Ko624PPI


Submerged Flowers: How to Create Stunning Underwater Centerpieces

Wedding centerpiece
Image source: Weddingwire.com
We are mostly made of water, as is our planet. It is an unusual molecule with characteristics that make it uniquely suited to support life. It is also evocative: like love, water infuses everything around us. It can be crushingly powerful and it can be gentle. Water carved the Grand Canyon and it shaped the continents. And yet, the gentle trickle of a mountain stream is one of the most soothing sounds there is. Using water in your wedding décor brings nature to your ceremony. It’s a common element in modern design, often paired with flowers and stones. Submerging flowers in water combines two disparate ecosystems, bringing a new focus to the flower’s delicate petals as they quietly float on your tables. It is also a clever budget-friendly design strategy. It’s chic and beautiful without being expensive or hard on the environment. A single bloom can serve as your entire centerpiece. Many different varieties of flower will withstand total submersion, from baby’s breath to calla lilies. Here are some instructions.

Use Real Blooms
Candle centerpiece
Image source: Bridalbuds.com
While it might be tempting to experiment with fake flowers since they last longer than the real thing, submerging fake flowers in water can be problematic. Over the course of the evening your water may turn color as dyes from the petals run. The vase’s glass will magnify the blossom, highlighting obvious imperfections like plastic stems or loose threads. When you use real blooms, that magnification becomes a bold feature, making visible those tiny details—the vein of a petal, the delicate ridge of a leaf—that make flowers so magnificently beautiful.

Choosing Your Flowers
Vase
Image source: Mywedding.com
It’s difficult to predict which flowers will work best when submerged. Orchids, lilies, and roses all hold up well under water for several days (as always, organic and locally grown flowers are best). It’s always a good idea to experiment with your flowers of choice before the wedding to make sure your displays look just right.

Keeping The Flowers Anchored
Flowers are naturally buoyant and they will float to the surface of your vase if you don’t weigh them down. There are a few ways to do this. You can glue the stems to the bottom of the vase with aquarium glue or you can attach mini fishing weights to the stems. Use pebbles to hide the weights. Your blossoms will look expertly planted.

Use Distilled Water
Using distilled water will insure that your display is clear and free from additives that may discolor the flowers or create visible floating particulates over time.

Get Creative
Submerged arrangements
Harveydesignsevents.wordpress.com
Use multiple vases of varying heights, add bamboo or fern fronds for texture, or keep it simple and give each table a single tall cylinder of floating blooms. Create a mangrove-esque display (look to the Sierpe River for inspiration) with twisting branches accented by the occasional pink lily. This is especially exciting if you have a wildlife or forest theme. Light your flowers from below or use mirrors to double their impact. A floating candle adds warmth and yet another clever juxtaposition to the arrangement. 


Wedding flowers DIY 1

Wedding flowers - 1
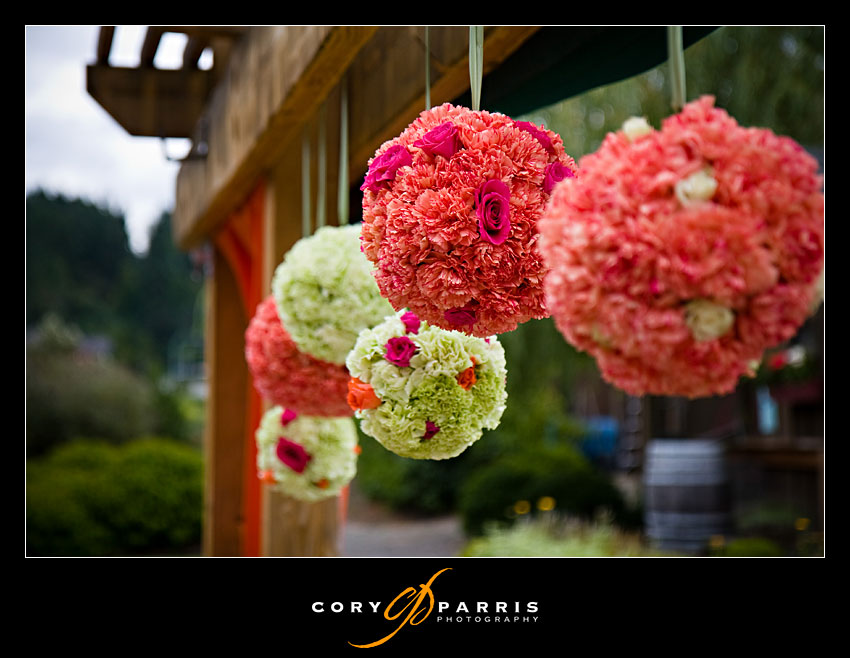
Flower Balls (AKA kissing balls)

Option 1. Silk flowers / fake flowers


Option 2. Fresh flowers


made of kermit mums

wedding pomander How to make a Pomander (Kissing Ball) for your Wedding


준비물: 스레로폼 볼, fresh carnations, Ribbon, Floral U pins, T-pins, Clay pots (optional ), Vases or flower bowls


Things you need: 
3″ Styrofoam Ball or 4″ Styrofoam Ball
Artificial Flowers (of your choice)
Ribbon (of your choice)
Floral U Pins 
T-Pins
Hot Glue Gun and Glue Sticks
Things to do:
1. Take your styrofoam ball and push a floral u pin through the “top” of the ball, then take the pin out. Place a few dabs of glue over the holes and place the floral u pin back in. Make sure that you leave about 1/4″ gap between the styrofoam ball and pin. The gap will be used later so that you can attach a ribbon or wire so that you can hang your pomander.
2. Next, separate your artificial flowers from their bunches and cut the stems to about a 1/4″ or 1/2″ in length. Starting from the top use your glue gun to create small dents in the styrofoam ball and add a dab of glue before placing each stem. Repeat this process until the entire styrofoam ball is covered. You can also use T pins or floral U pins instead of hot glue, depending on the size of your flowers and styrofoam ball. It may help if you start from the top and work your way down in a line and repeat the process this way so that you ensuring that the flowers are evenly placed with no gaps.
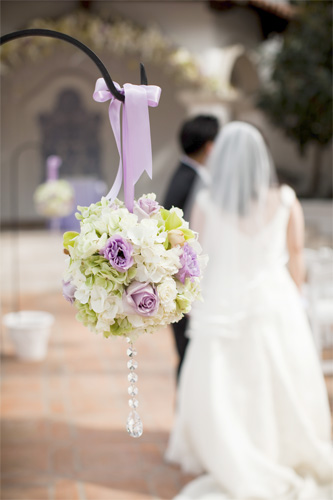
3. Once your pomander is completely covered with flowers, string your wire or ribbon through the floral U pin at the top. The length of the ribbon will depend on how you choose to use your pomander. Shorter loops are great for pomanders that will be carried by individuals in the wedding party and longer loops are better for pew decorations. You can also just skip the ribbon and hanging altogether, creating pomanders for bowls and wedding centerpiece decorations.


Plan Time for Flower Re-hydration

It can take up to 48 hours and depends on the flower


All Photo Rights Reserved by Nibbled.

Wholesale flowers are shipped in a suspended state and will not be fully opened in bloom without proper re-hydration. They should be left in a cool dark room with plenty of fresh distilled water to drink. Consult with your wholesale company of choice for specific directions as they can vary by flower.


DIY Wedding Flower Pomanders

Created from hundreds of red carnations

Creating Carnation Wedding Decorations
If you spray paint clay pots, I recommend using a clear coat to seal the paint. We sent guests home with the flower arrangements and many ended up with silver hands from handling the pots because I didn't use a clear coat.
All Photo Rights Reserved by Nibbled.

How to Create A Carnation Pomander

Use fresh flowers or silk, both create lovely kissing balls

  • 1
    Order your flowers at least 3 days before your event. They will be shipped in a suspension state and need at least 48 hours to rehydrate. Plus you'll need a day to assemble the pomanders. I had mine delivered on a Tuesday, assembled the flowers on a Thursday and they were still fresh and beautiful on Saturday for our evening wedding. In fact the arrangements held their beauty for 2 full weeks after the wedding.

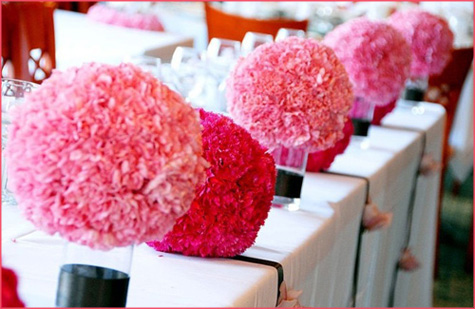
    I recommend sticking with one color of carnations for the beginner. The solid color look will hide mistakes and be quicker to put together.
  • 2
    When your flowers are ready, soak the floral foam in distilled water for the recommended amount of time the brand specifies.
  • 3
    If planning to hang or hand carry the pomander, you will need to wrap floral tape or wire around the circumference of the floral foam, and once more crossing the tape or wires and dividing the ball into quarters. Create a loop from the ends of the wire or tape to slip your pretty ribbon into. It's a good idea to test drive that this will hold, as these can be very heavy.
  • 4
    Snip your carnation heads at an angle leaving 1.5"-2" of stem to insert into the floral foam.
  • 5
    Push the flower head until it fully sinks into the flower foam. Following a straight line create a ring of flowers around the ball.
  • 6
    Now make another straight line of flowers perpendicular to your last line. You will have made 4 sections of uncovered floral foam. Fill in these sections with carnations. Be careful not to leave any gaps.
  • 7
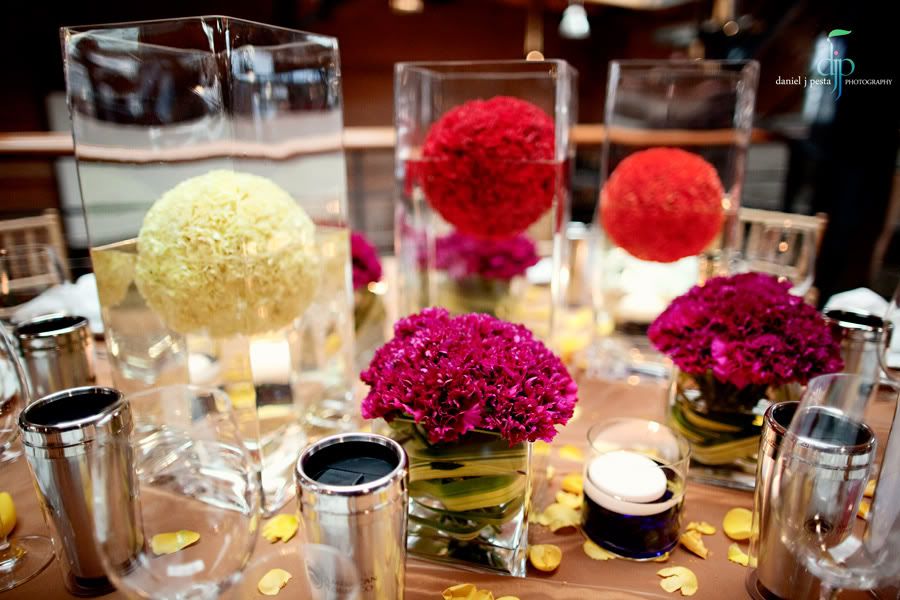
    When finished the ball can be set out on top of a table alone or coupled with other accessories. You could place the pomander on top of a clear cylinder vase or spray paint a clay pot. They also look lovely hanging from the ceiling, an arch, doorways or the backs of chairs.


    Transporting the Pomander Balls

    Mine were already attached to clay pots


    Carnation Pomander Wedding Decorations
    All Photo Rights Reserved by Nibbled.

    Using the box the carnations shipped in, we cut holes smaller than the lip of the clay pots and gently set each one into the hole. This made them much simpler to transport.


How to create Pomanders to sit on a Clay Pot

A different spin to the hand or hanging pomander


Fresh Flowers for the CeremonyCreate the Pomander using the same steps as the hanging pomander, but leave empty space to attach the flowers to the pot using the steps below. I found it easier to attach the ball to the pot about halfway through making the pomander.

You will also need the following items:

  • floral foam bricks

  • clay pots that the pomanders will sit atop, pick a pot only a couple inches smaller in diameter than your ball, as you need these to be steady to prevent tipping

  • spray paint to coat the clay pots, metallic looks great

  • a clear protective top coat to keep the spray paint on the pots

  • wooden dowels

I had the flowers delivered on a Tuesday and let them soak in distilled water and open up for 2 nights. Thursday afternoon the floral foam balls were soaked and each carnation was snipped to a 2 inch stem then stuck in the floral foam. I left the bottom part of the ball unfinished to attach to the clay pot. These pomanders are heavy and an 8 inch ball made a huge, heavy but impressive display!

Way in advance, I had sprayed cheap clay pots with metallic silver spray paint. It would be a good idea to spray with a clear coat to prevent the silver paint from rubbing off. I didn't do this and everyone that handled the pots ended up with silver paint on their hands.

To attach the pomander to the clay pot, I used some of the brick style floral foam, also soaked, and cut and smushed it into the pot, then stuck several wooden dowels into the floral foam of the pot and carefully placed the pomander on top of the dowels and gently pushed it firmly to the base. You will want 2-3 dowels in each pot to ensure the ball can't spin or wiggle once on the base. If you are making smaller pomanders, it may not be necessary to use as many dowels.

The flowers were misted with a bottle of distilled water when finished and again on Friday evening, the night before the wedding. We transported them by taking the boxes the flowers were shipped to me in and leaving the boxes intact, cut small circles for each pot to sit in. With a careful driver they all made it in one piece!

My red carnations pomanders looked spectacular lining the aisles to the ceremony and were moved inside and grouped together on a long table for a beautiful focal by the dance floor. At the end of the evening they were sent home with guests as a prize and they lasted the better part of 2 weeks, some without ever re-watering the floral foam. You'll be surprised how many people will be excited to take a kissing ball home!

Carnation Pomanders were a lot of fun to make, and I'd do it all over again in a heartbeat. It does take up some of your precious pre-wedding preparation time, but it's a great group activity to gather your bridesmaids and other family members before the big day.

Tip: If you've already had your nails done, wear a pair of latex gloves while working with the flowers to avoid any staining or chips to your manicure.
Note: The white columns my pomanders were displayed with were rentals.
All Photo Rights Reserved by Nibbled.


Leftover Carnations? Here's an idea!

Use them to create a gorgeous tray for your seating place cards


Table Place Card Presentation
I ordered my carnations in bulk and ended up over ordering by quite a bit. So we filled three plastic trays with floral foam bricks and stuck carnations into them using the same process as the pomanders. Plunk the seating cards on top and presto! Easy and looks and smells great! Why did I have a Lion Table? Find out about my Zoo Wedding!